Assignment
 Write a program that loops through the following colours, with each colour being displayed for 500 mS):
- green
- yellow
- red
- magenta
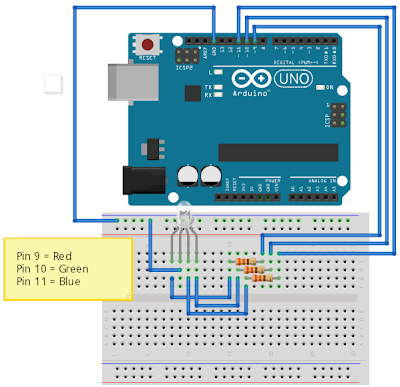
- blue
- cyan
- white

Educator, Geek, Photographer, Motorcyclist, Lifelong Learner
Write a program that loops through the following colours, with each colour being displayed for 500 mS):
Refer to this page for this activity. Do NOT copy and paste the code — type it in (or you won’t learn anything…).
Note that the 100 Ω resistor is optional. You can leave it out for simplicity (and extra volume!).
Once you have the basic buzzer program working, research for loops and modify the program so it loops from 100 Hz to 10,000 Hz in 20 Hz increments and then down again, infinitely.
Save this program as “buzzer_1”.
Write a program that exactly mimics this metronome:
You will likely want to refer to the Tone reference page for assistance. (Read the syntax carefully for an important tip!)
Note: for this assignment I want you to use the tone() function using this syntax:
tone(pin, frequency, duration)
When I see you for marking be sure you can explain the “math” involved in setting the metronome frequency.
Save as “metronome”.
This activity also uses two LEDs. Have fun with it! [Source]
Save as “star_wars”.
Using the Star Wars program as a starting point, adapt it to play Twinkle Twinkle Little Star.
You can delete any references to the LEDs.
Save as “twinkle”.
Using the Arduino reference page as a starting point, research the basics of how to use pulse width modulation (PWM) on the Arduinos.
For this activity, you will wire up a potentiometer so it controls the brightness of an LED.
Refer to the Arduino Potentiometer Activities page for further instructions.
This activity is simply adapted from the LED Dimmer activity, but you will be using the light sensor in place of the potentiometer.
Note that the light sensor input will have to be “scaled” so that when the sensor is covered (dark) the LED will fully lit and when it is uncovered the LED is fully off.
Background
This is a schematic for your circuit:

Some programming basics we will need to know for our program:

Assignment
Write a program that builds on the basics we learned about in our Blinking LED circuit, this time using the value returned from our sensorValue variable as the “on” delay value (set the “off” delay value to 500). Use pin A0 for the input from the potentiometer.
After you have this assignment completed, call your instructor over to have it marked.
Assignment 2
Add the statement
Serial.begin(9600);
to your setup() function and the statement
Serial.println(sensorValue);
to your loop() function.
Run this program, then call your instructor over for a discussion on how to convert this value to a voltage value. Modify your program accordingly.
After you have this assignment completed, call your instructor over to have it marked.
| [Lesson Plan]
This overview is a good introduction to the Arduino. Watch the tutorial and reproduce the experiment that is done in the video. Note!
Your circuit should look similar to this:
This is a schematic for your circuit:
This is the code you should have:
Extension Activity Experiment with your program to determine the minimum delay you can have before the LED no longer appears to be blinking? What “rate” does this correspond to? Questions
Note!After you have the experiment completed, call your instructor over to have it marked. |
Enter the following “empty” program into the Arduino editor. Learn how to upload the program into your Arduino.
void setup() {
}

void loop() {
}
Save as “Empty Program”.

![]()
Unless otherwise instructed, perform these activities in order:


You must be logged in to post a comment.